 |
| Installed PiTFT in LumenEd devices |
While working at LumenEd, I got the chance to work on with a lot of different peripherals and chips that go with the Raspberry Pi. One of those items was the PiTFT touchscreen.
Our goal was to develop a control application, similar to a remote, that would handle all user inputs to RaspBMC, our OS of choice. After a few weeks of tinkering, design and development, we were able to put together a simple, yet sufficient, interface, that has been deployed on our devices. This post explores the bare minimum that was needed to get things working together. To see the device in action, take a look at an
early demo video.
 The software application for PiTFT is available on Github. It has been developed in Python, due to the extensive support that it has on the Pi, as well as the reduced development time that it provides (which was a priority for us during the development phase). We have used Pygame as our GUI library, for similar reasons. Also, it depends on TSLIB, for touchscreen input, and fbcon, for output to the touchscreen frame buffer.
Moving to the touchscreen itself; getting it working turned out to be a pit of a puzzle at first. Over the period of 4 days however, we were able to figure out all that was needed for it to perform reasonably well in RaspBMC. Firstly, it is necessary to calibrate the touchscreen for optimal touch performance. This is easy to do once the necessary libraries have been installed. Next, we need to load the calibration profile from within the application. This requires the use of environment variables, specifically the first four as shown below. These variables specify the input driver to use, the configuration of the hardware, and the calibration constants. For Pygame to interpret and process the input correctly, we also need to specify the SDL parameters. The parameter names are self explanatory.
Another aspect of the GUI design, was the need for elements such as buttons. Pygame, surprisingly, lacks this basic GUI element. Hence, we wrote a custom class for buttons, and certain functions for some other elements as well.
At this point, we started to look at the performance of the application. We saw extremely high CPU usage which given the size and simplicity of the display elements and rendering, seemed counter intuitive. Nonetheless, two optimizations were incorporated and this resulted in a drop in the CPU usages to almost a eighth of the original values. One optimization was to reduce the refresh rate to the minimum possible which can be around 4-5 fps. This does not interfere with input responsiveness as the event generation is independent of the screen updation. The other optimization was to reduce the update area to only those sections that were actually changing on a per second basis. This in itself, resulted in a significant performance improvement.
The last part of the application was forwarding the inputs to XBMC and querying specific parameters to update the touchscreen display. XBMC features an extensive JSON API accessible via the web server. With the help of a wrapper function, the API calls became short and simple. The latency for these calls was also reasonable short on the local server, making the application responsive.
Overall, the application was interesting to develop and we are very happy with its performance till date. If you would like to experiment with this application, then download version 1.0. Later versions have been extended and integrated with device-specific hardware, and hence will not be usable externally. The current versions support a camera interface, and a battery display as well.
Lastly, if you happen to be starting with the Raspberry Pi, I would certainly encourage you to get a hold of the PiTFT and start hacking. It will make for an interesting learning experience about embedded Linux architecture. Happy hacking!
early demo video.
 The software application for PiTFT is available on Github. It has been developed in Python, due to the extensive support that it has on the Pi, as well as the reduced development time that it provides (which was a priority for us during the development phase). We have used Pygame as our GUI library, for similar reasons. Also, it depends on TSLIB, for touchscreen input, and fbcon, for output to the touchscreen frame buffer.
Moving to the touchscreen itself; getting it working turned out to be a pit of a puzzle at first. Over the period of 4 days however, we were able to figure out all that was needed for it to perform reasonably well in RaspBMC. Firstly, it is necessary to calibrate the touchscreen for optimal touch performance. This is easy to do once the necessary libraries have been installed. Next, we need to load the calibration profile from within the application. This requires the use of environment variables, specifically the first four as shown below. These variables specify the input driver to use, the configuration of the hardware, and the calibration constants. For Pygame to interpret and process the input correctly, we also need to specify the SDL parameters. The parameter names are self explanatory.
| os.environ["TSLIB_TSDEVICE"] = "/dev/input/event0" | |
| os.environ["TSLIB_TSEVENTTYPE"] = "INPUT" | |
| os.environ["TSLIB_CONFFILE"] = "/etc/ts.conf" | |
| os.environ["TSLIB_CALIBFILE"] = "/etc/pointercal" | |
| os.environ["SDL_FBDEV"] = "/dev/fb1" | |
| os.environ["SDL_MOUSEDEV"] = os.environ["TSLIB_TSDEVICE"] | |
| os.environ["SDL_MOUSEDRV"] = "TSLIB" | |
| os.environ["SDL_VIDEODRIVER"] = "fbcon" | |
| os.environ["SDL_AUDIODRIVER"] = "alsa" |
Another aspect of the GUI design, was the need for elements such as buttons. Pygame, surprisingly, lacks this basic GUI element. Hence, we wrote a custom class for buttons, and certain functions for some other elements as well.
 |
| Navigation Menu |
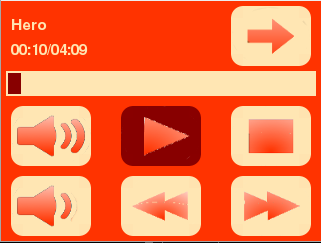 |
| Playback Control |
At this point, we started to look at the performance of the application. We saw extremely high CPU usage which given the size and simplicity of the display elements and rendering, seemed counter intuitive. Nonetheless, two optimizations were incorporated and this resulted in a drop in the CPU usages to almost a eighth of the original values. One optimization was to reduce the refresh rate to the minimum possible which can be around 4-5 fps. This does not interfere with input responsiveness as the event generation is independent of the screen updation. The other optimization was to reduce the update area to only those sections that were actually changing on a per second basis. This in itself, resulted in a significant performance improvement.
The last part of the application was forwarding the inputs to XBMC and querying specific parameters to update the touchscreen display. XBMC features an extensive JSON API accessible via the web server. With the help of a wrapper function, the API calls became short and simple. The latency for these calls was also reasonable short on the local server, making the application responsive.
| def nav_down(): | |
| method = 'Input.Down' | |
| getJsonRemote(method) |
Overall, the application was interesting to develop and we are very happy with its performance till date. If you would like to experiment with this application, then download version 1.0. Later versions have been extended and integrated with device-specific hardware, and hence will not be usable externally. The current versions support a camera interface, and a battery display as well.
Lastly, if you happen to be starting with the Raspberry Pi, I would certainly encourage you to get a hold of the PiTFT and start hacking. It will make for an interesting learning experience about embedded Linux architecture. Happy hacking!
No comments:
Post a Comment